|
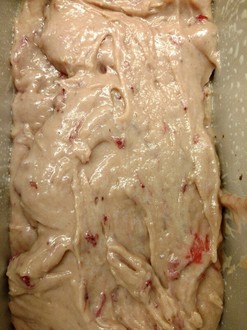
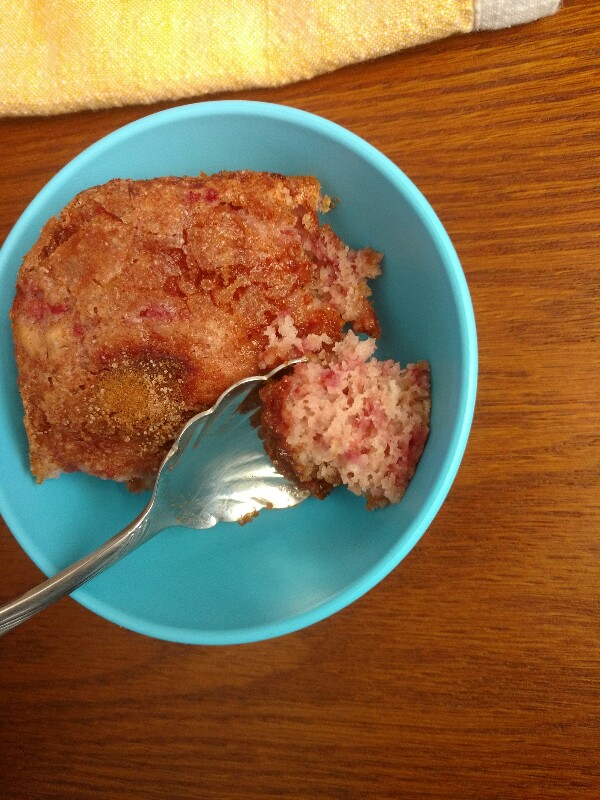
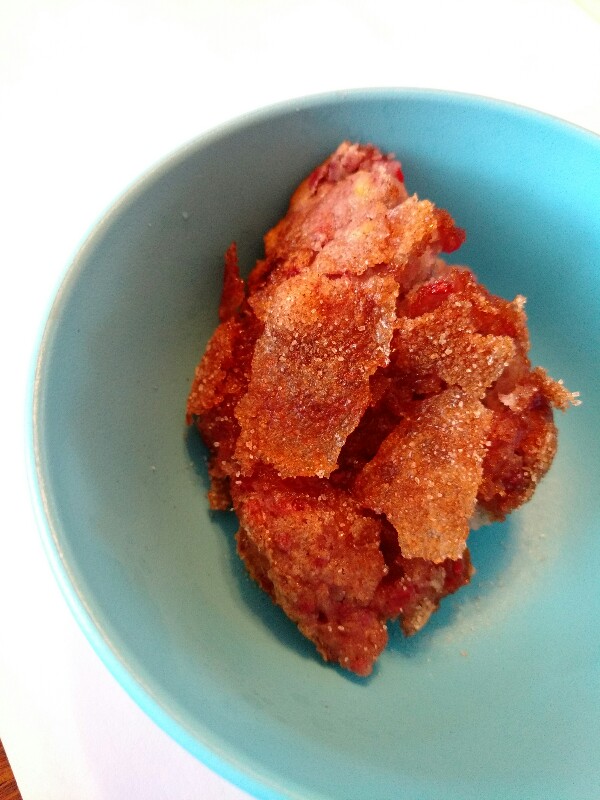
It's been 3 weeks, but I am still baking anything and everything with strawberries from my picking bonanza. My family, our neighbors, and even the allergy office staff have been supportive taste testers for me, and I think we finally have a new recipe to come back to over the years: a strawberry quick bread that isn't overly sweet and makes enough to share. 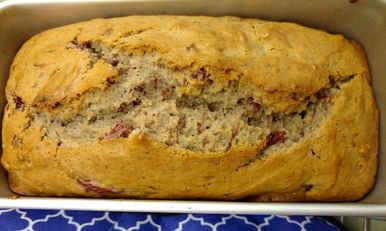 Like other quick breads, this one relies on baking soda and powder instead of yeast, and it bakes without kneading or proofing in under an hour. The recipe makes two full-size (9x5 or 8x5) loaves; if you cut it in half, it's a great way to use up the very last bit of mashed strawberry on hand after jam is done.
This recipe is our third try. The first relied only on lemon curd for the sweetness and liquid, but the texture wasn't quite right. The second was a best-guess version I settled on without any guides except my long-time love of veggie (like pumpkin or zucchini) quick breads. That attempt was shareable, but I find the aftertaste too bitter for my liking---that's a reflection of the baking powder---and too dry to enjoy without a spread. I kept all of my second-try ingredients, but I increased the applesauce and reduced the baking powder. Quick breads, especially ones with acidic fruits, are forgiving for egg-free bakers: they naturally react with small amounts of chemical leaveners to rise. Our final version still had a nice crackly dome even after I cut the baking powder in half. 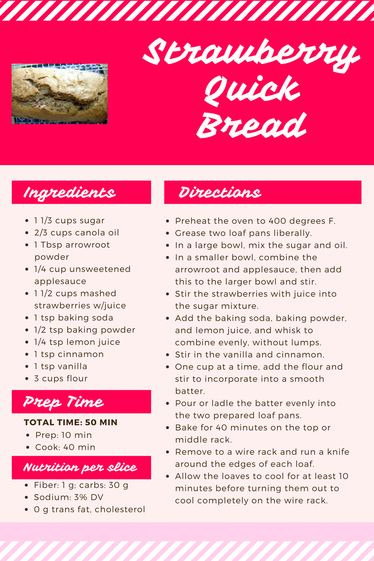 For our low-key, at-home Memorial Day, we'll slice the strawberry bread and top it with some fresh blueberries and some SoDelicious coconut nondairy whipped topping for a red, white, and blue dessert. I hope that you have a wonderful long weekend with family, friends, and good food! If you try the recipe, don't forget to let me know here, or on Instagram, too.
0 Comments
Some school-year weeks, you just dream of summertime. This week started out like that: rainy and windy, I was ready to sit by the pool and not get kids off to bus stops. Then Wednesday was (another) early release, and I remembered how challenging it can be to meet work deadlines when school’s out. Grass is greener, I suppose.
One good thing about early release, though, especially when it’s on a sunny day after some blustery weather, is that it forces me to stop and make some treats for the kids to have during their extra free time. This week, I tried an old recipe I had worked on and dropped for awhile: key lime blondie bars, a nice reminder that summer isn’t here yet but is on its way. 
My brownie and blondie recipes, completed and in progress, all use an 8x8 square pan, and they all have a decent rise during baking. I noticed that my family-archives original suggested a 9x13 cake pan, though, and wondered what would happen if I used that, or how I could switch one recipe between the two. It turns out that some people have done a lot of calculations to make those switches possible. I’m a bit of a math geek, but I am not known for being precise in the kitchen, or for patience. I love that this resource is available (with pictures!), but I admit to just scanning it and pocketing it away for later. This time, I decided to just use the recipe on hand (with a bit of flour averaging) and see what happened. I had few notes on how it turned out in a square pan, so the attempt was really a fresh start all around, anyway. I was discouraged when I had to really spread the batter thin to reach those 13-inch corners. I kept the 350-degree cooking temperature but reduced the cooking time by 8 minutes to accommodate the thinner layer.
The bars, after they completely cooled, were sliceable and easy to dust with powdered sugar for a quick topping. And the larger pan made this a treat that definitely could feed a crowd. I think the recipe as it stands still needs some experimenting: maybe some more water to reduce crumble, maybe back off on the cornstarch (or tapioca starch, which I tried this time) to reduce gumminess.
Or maybe I’ll take a closer look at those math conversions; I think a proportional increase in everything might be just what the recipe needs to make it a little bit cakier---for those fancy people who like to eat bars with forks instead of fingers (we don’t do that around here, though). If you try the recipe as it stands, leave some comments about what you liked and what you might change. Baking with food allergies is part science, part art, and most recipes are never truly complete. 
Today, an extra recipe post. Between piles of work and seemingly endless partial weeks for my kids' schools, I needed a kitchen break but had just a few minutes to spare more days. I came across the Vegetarian Mamma's coffee cake tweet, and it looked too simple and too yummy to pass up.
The original recipe used a neat trick---pancake mix instead of flour---which my family has also tried on occasion. Not one to follow instruction well, I changed quite a bit of the other ingredients...but I stayed true to the directions in what must be the easiest, and fastest, coffee cake recipe in the world. I can't believe how well this recipe worked, even with all of my tweaks (and with not enough mix in my pantry to begin with!). This could replace my all-time favorite speedy scones for lazy weekend mornings, at least sometimes.
Here's my version for a pancake mix coffee cake, with tapioca starch and lemon juice to thicken and flavor the liquid instead of sour cream...and with berries instead of chocolate so that everyone in my family gets a bite, even during Lent. It turned out awfully pink but surprisingly tasty. I'm sure to try the chocolate chip version after Easter (and after buying more pancake mix), though. 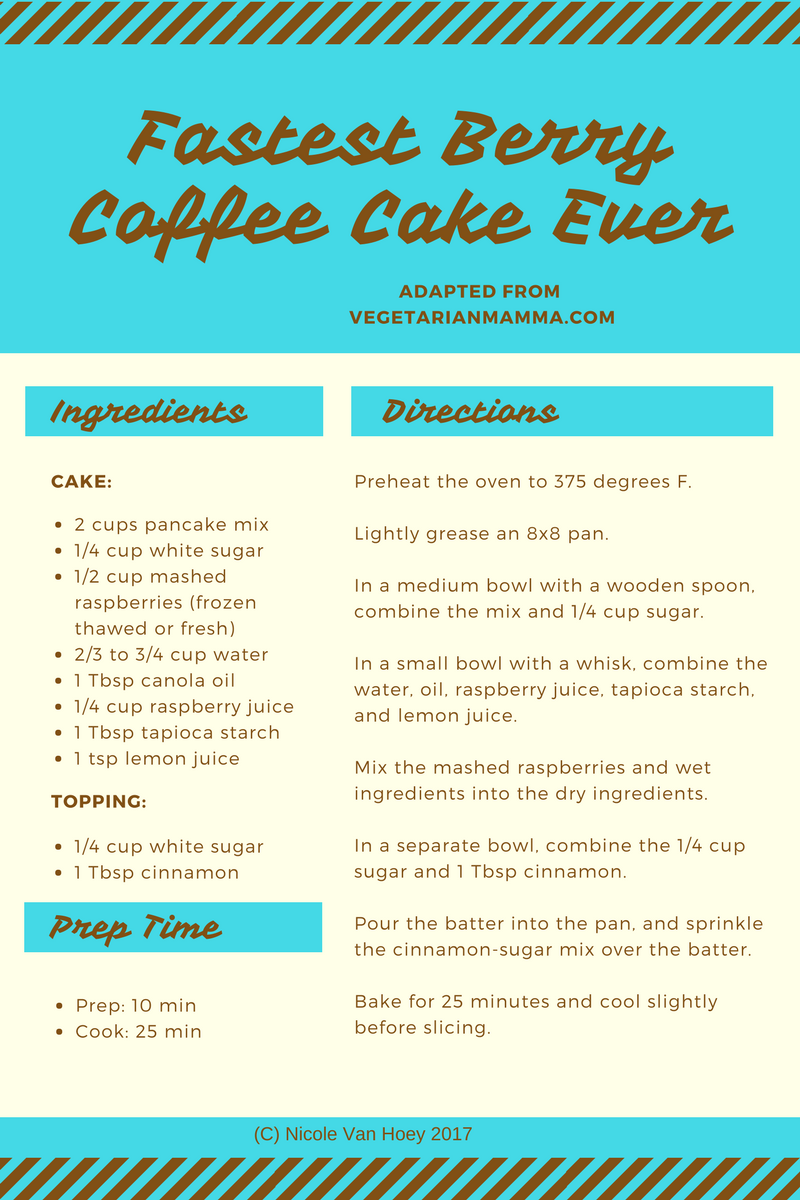
You'll find this version posted in the #freefromfridays collection on St. Pat's Day, too:

If you are interested in the lovely original version, which uses an Enjoy Life mix without gluten (and safe chocolate!), check it out at the Vegetarian Mamma blog. Have you tried baking with pancake mixes? Or do you have a great vegan coffee cake recipe to share? I'd love to hear about it! I've written before about how much I love a good snack: something with crunch or bite to it and ideally with plenty of fiber and/or protein. Last month, I found and held onto some homemade Larabar recipes from realfoodrealdeals. They seemed simple and healthy enough to be perfect for this busy work and school week of ours. Well, sometimes in baking, you try something new and you end up with throwaways: all of those first (or fifth) attempts that just don't work out, even with a recipe on hand. For this no-bake snack attempt, we substituted almonds for all of the other types of nuts and tried multiple bar varieties. We used measuring cups and spoons for the apple pie version, but it just never came together for us. Even after a good refrigeration, it was too crumbly to call a bar. I couldn't actually throw away tasty food though; it's become a chunky granola topping for our yogurts instead. 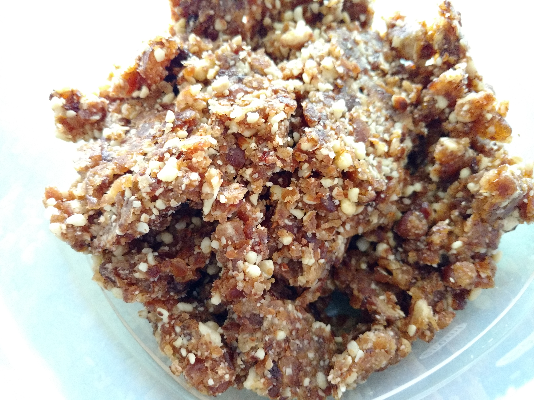 Next try: on to lemon bars! We started with a clean blender and a counter full of almonds, dates, lemon juice, lemon oil, and lemon zest. And we were determined to get this one sticky enough to press and slice. We tossed into the blender an entire bag of dates, half the bag of almonds, a couple of shakes each of lemon oil and zest, and a quick pour of lemon juice. When it looked almost-right, we added a few more dates for good measure and pulsed it some more. 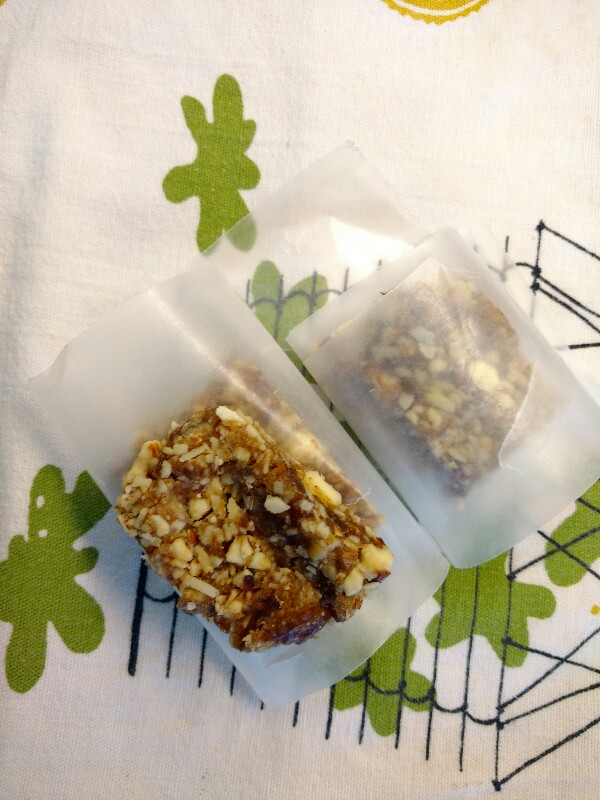 Bakers usually share recipes that come out tasty and beautiful, but that didn't quite happen for us this time. After about an hour in the fridge (the longest time we could make ourselves wait), we ended up with tasty, not-bad-looking bars with an awesome lemon aroma...but no real recipe to try to duplicate. Sometimes, even in baking, success doesn't come with measurements and exact recipes. Instead, it comes from the fun of piecing it all together. If you have a good no-bake bar recipe, we'd love to try it! I'll be experimenting in my own kitchen with different flavors, quantities, and ingredients, too, until I get something more exact to share...as soon as I get out to buy a lot more dates.
Ahhh, I've been putting off this blog all week.
We've had a full and busy allergy week:
I'll tell you, the emotions are high these days. But yesterday, my daughter had early release, and I put aside work, and we just baked in the kitchen together. She barely needs me there anymore, really, but it was a joy. All of those food allergy topics are important, and relevant, and I'm sure to share them in my writing as I go. But right now, I'm chucking all of the worries and posting my daughter's brownie recipe, which finally improves on the cakey version I have on hand. The recipe stays sturdy as a cake as it cools (no sinking!) because of the just-right amount of applesauce...and it's got some chewy goodness from extra melted chocolate chips. 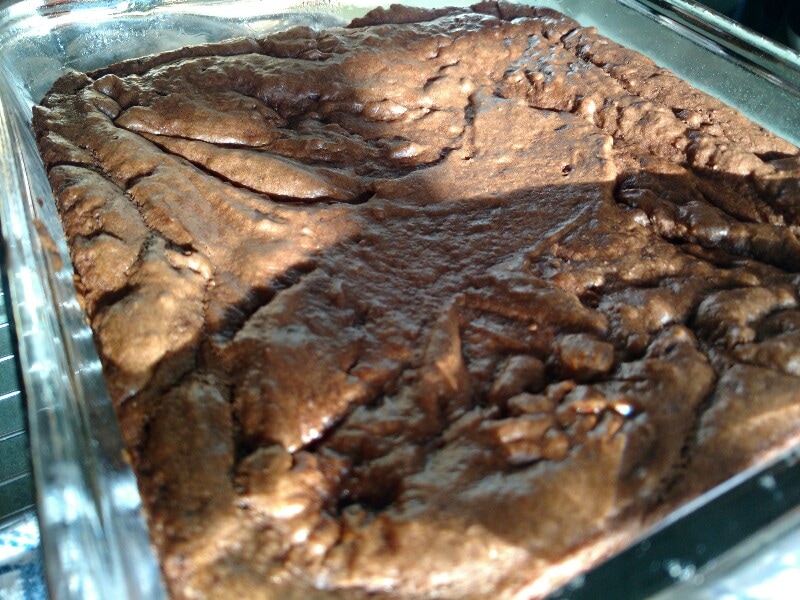
These brownies are, as usual, vegan + free from soy/tree nuts/peanuts/seeds. They're delicious. And already gone (I gave them away! It's Lent! I didn't eat 16 brownies already, even with help.) 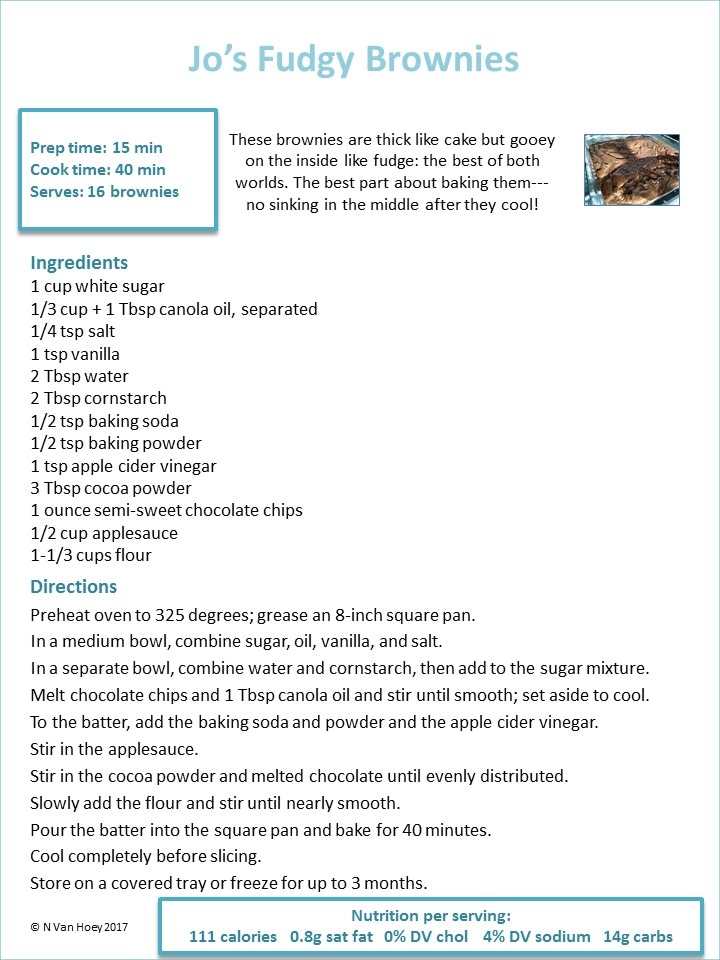
Enjoy the baking and the snacking, and have a great weekend! PS -- If you are into cakey brownies instead, just leave out the chips and extra tablespoon of oil. You'll still get yummy chocolate treats, just with an airy texture.
I've been daydreaming about M&M cookies for awhile now. They weren't something we made at home when I was little, but my mom had a recipe in her files for them anyway, and so do I. They're just right when you want a cookie but chocolate chip isn't crunchy enough. I started thinking about replacing the M&Ms with Skittles or some other dairy-free candy, but it just didn't sound appealing enough to try (because nothing really replaces M&Ms for me)...until now.
Why now? I missed out all of the holiday baking this Christmas while I was completing cardiac rehabilitation (and I officially "graduated" on New Year's Eve!). Our holiday dessert effort this year was Oreos (how are they vegan?) dunked in melted safe chocolate chips. The kids loved them, but I missed my baking time. I've made great recovery strides in 2017 already, so I decided that I'm ready to shower the people I love with cookie tins for Valentine's Day instead. I'll be returning to some favorite treats (last year's truffles, for sure), but I also wanted to make some new variations on my standards. My youngest, the one with the most (and the anaphylactic) food allergies, recently developed a taste for spicy Red Hots, that old cinnamon imperials hard candy. And they happen to be sold in bulk at the store across the street from our neighborhood. That scenario was sort of begging me to come up with a cookie. 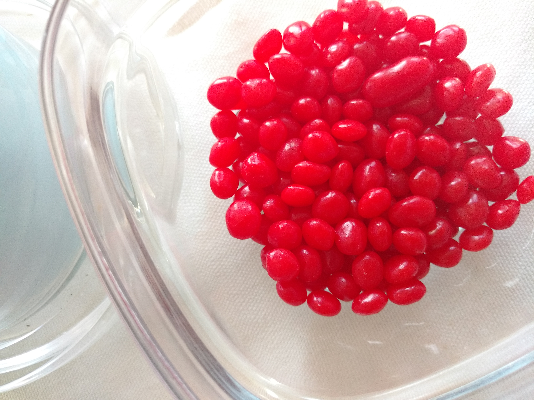
The key to M&M cookies, I've learned, is to bake a cookie soft enough to press the candies into just after they come out of the oven. I was game to try that; I used some old M&M cookie examples and my own chocolate chip recipe, but I increased the sugar-to-oil ratio and shortened the cooking time. But pressing in candy after baking just didn't seem like enough spicy goodness to me, so I added Red Hots into the dough, too. 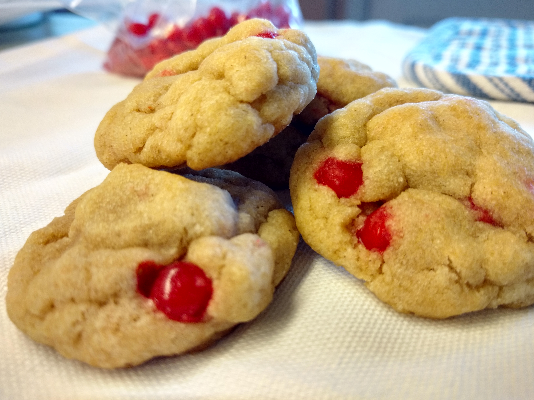
On day 1, I used half of the dough for baking; I added 1/4 cup flour to the other half and froze it in a log. After my first batch of cookies, with candy in the dough that I dropped onto cookie sheets to bake, I was pretty happy. The cookies were soft, even the next day, and the candy was softer but not burnt or melted. The cookie jar emptied rather quickly, so I pulled out the frozen long on day 2. Slicing the cookies frozen was something new for me, but I baked this batch exactly the same way as the first. At the end, though, I pressed more Red Hots into the tops of each cookie to see if they really would settle in like M&Ms do. And yes, they did! 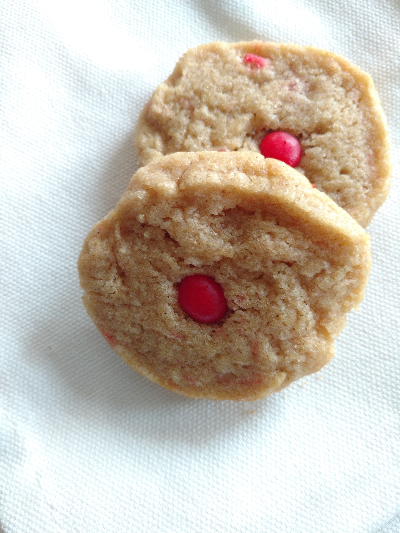
You might wonder why this post is called "Red Hot Hearts" when there are no hearts to be found. Well, my initial goal was to use the M&M cookie variation and some extra flour to roll the dough out and bake in heart shapes. I think that my next attempt with this recipe might pull that goal off...but I need some extra patience before I succeed there. For now, here's the recipe I used for the fresh and frozen doughs. Enjoy, and happy Valentine's day! 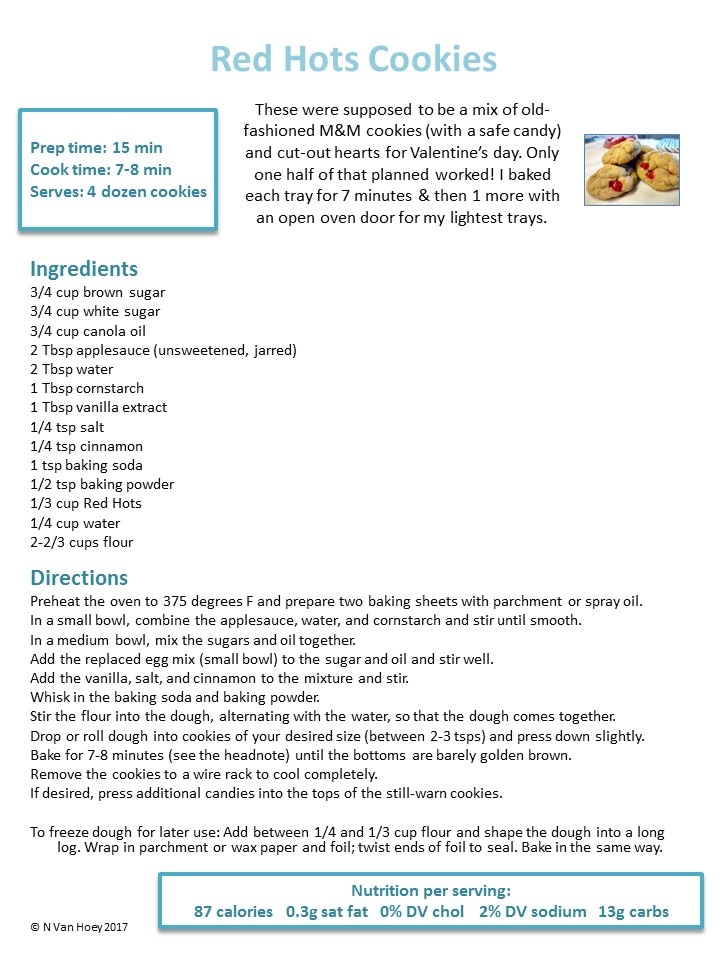
|

Hi, I'm Nicole. 
ABOUT THE BLOG An apothecary is a person or a place. Either one implies healing and relates to pharmacy in its truest sense, as a source of treatment and advice. This blog is my way of uniting my pharmacy training with my efforts to provide a healthy and safe lifestyle for my family. In true apothecary form, I research and prescribe alternative ingredients that work just right in each specific recipe, and I would like to share the results with anyone who needs help making their own family’s kitchen allergy safe and heart healthy. Categories
All

I made the 2017 Top-40 Food Allergy blogs!


Nicole Van Hoey's books on Goodreads
 Bakery Bites: Breads and Treats Without Dairy, Eggs, Nuts, Seeds, or Soy
ratings: 1 (avg rating 5.00)
|

 RSS Feed


